Message from Ms. Prater
Going forward, I will try to post a recap of what we covered in class on our website. My goal will be to also include any links you’ll need for the upcoming class, so you can click here directly instead of having to copy and paste into your search bar.
This is a learning experience for me too, and I greatly appreciate everyone’s patience as I figure out the best way to support you.
Class Recap – Week 1
-
Thank You All
Our first class went great! Thank you all for your attention and participation. I know it was a fast overview of what web design is and why it’s important, but I hope you were able to take away something new.
We started with a short quiz to get you thinking, and I encourage you to try the short Codecademy course on tech professions this week. It takes roughly an hour to complete. This will help you explore which roles might be the best fit for you. You will find the link below.
-
Supplies
Please remember to bring your flash drive to every class. It will allow you to pick up at home right where you left off in class. This wasn’t critical for our first session, but it will be very important as we begin our projects.
I will bring an extra laptop with VS Code installed and an extra mouse each week, in case someone needs them.
-
Missed Class?
For anyone who was out, a recording of our lecture can be found below.
-
Access The Slideshow
You can click the link below to view the slideshow again.
How to use the slides:
Review Slides 15–22 to strengthen your confidence in the answers you select. This will be especially helpful for those of you who were feeling torn between selections.
After completing the Codecademy quiz, read through Slides 23–26. These slides describe different tech roles and career opportunities.
As you read, take note of the career options listed. If you are interested, look up details such as salary ranges, education requirements, certifications, and tools mentioned.
Slides 23–26 also include a few extra related roles beyond what’s in the main descriptions.
-
Participation (Optional)
If you feel inclined, please share what you learned about these roles at the beginning of our next class.
I would especially love for at least one person from each career category to share something. If you think that might be you, you are welcome to volunteer. If no one volunteers, I may ask for someone to share. You are also welcome to say “no” if you’d rather not — and that is completely okay, too.
Here are the clickable links for both the quiz and the short Codecademy course.
-
What's Next
We were able to get through most of the slideshow, but we didn’t yet cover examples of good websites vs. bad websites. We’ll start there next week.
Here’s the plan for our next session:
- Discuss results from the quiz and, for those who tried the Codecademy course, share what you learned.
- Review examples of good websites and bad websites.
- Inspect real website code.
- Begin writing your first HTML document.
Class Recap – Week 2
-
Thank You All
Thank you for your attention in class yesterday.
We didn’t get to cover much between class photos and some technical hiccups, but I’m posting the lecture recording anyway for anyone who finds rewatching helpful. It’s a strategy that helps me, and I want to support my fellow visual/observational learners.
I’m working on a few fixes so pages load as expected next time. In the meantime, a huge thanks to Audrey for saving the day with her hotspot.
-
Missed Something?
The recording of our lecture has now been posted:
-
Homework
Please click “Looking Ahead – Week 3” in the next section and open the YouTube tutorial that demonstrates your homework assignment. It walks you through how to open VS Code, access your project files, and create your first website.
Plan for about 45–90 minutes to complete it.
Class Recap – Week 3
-
Your Homework
- Work through the YouTube tutorial Lecture - Week 3 below. Further down the page, you’ll find summaries of each process covered in the tutorial—for those who prefer to read.
- Practice the Edit → Save → Refresh cycle repeatedly.
- Write down questions/topics you want to discuss next class.
-
Stuck?
Contact options: You can send an email, ask in the parent text group, or post them directly to the YouTube video if you are comfortable with that. It's semi-private, so only your class members and parents of class members will be able to view it.
Remember: If you have a question, chances are someone else has the same one. Don’t be afraid to ask. However, if you’re not ready yet, write the question out as if you're going to ask it. Putting it into words is step one toward solving it—it sharpens your thinking, exposes what’s missing, and gives you ready-made search terms. Many times you’ll spot the answer while you’re writing.
-
Lecture - Week 3
-
1. Opening VS Code
- How to find VS Code on a Windows device (Windows key → type Visual Studio Code or Code).
- How to pin VS Code to taskbar / menu bar for easy access.
- Reminder: VS Code may look slightly different depending on the version and device.
-
2. Accessing Your Project Files
- Plug in your flash drive labeled WEBDESIGN.
- Navigate to:
WEBDESIGN → Fall25 → Projects → iCanCode. - Open the file index.html (this is the homepage of your site).
- Approve the security prompt: Allow untrusted files.
-
3. Creating Starter HTML Code
- Use Emmet abbreviation shortcut:
- Type
!(Shift + 1) → then press Tab or Enter. - This generates the starter HTML structure.
- Type
- Use Undo/Redo shortcuts:
- Undo → Command/Control + Z.
- Redo → Command/Control + Shift + Z (or Ctrl + Y on Windows).
- Use Emmet abbreviation shortcut:
-
4. Understanding the Starter HTML Structure
<!DOCTYPE html>→ declares HTML5.<html lang="en">→ sets the language.<head>section: contains information about the page (not visible on the page).- Meta charset (UTF-8) → character encoding.
- Meta viewport → makes site responsive.
- Title → text that shows on the browser tab.
<body>section: contains everything visible on the page.
-
5. Editing the Title
- Change
<title>Document</title>→<title>About Me</title>. - Save your file:
- Mac → Command + S.
- Windows → Ctrl + S.
- Open the file in Google Chrome to preview:
- Right-click
index.html→ Open With → Google Chrome. - Confirm that the tab now says About Me.
- Right-click
- Change
-
6. Adding Content to the Page
- Work inside the
<body>section. - Create a header section:
- Add
<header>…</header>.
- Add
- Add a main heading:
<h1>Your Name</h1>.- Importance: H1 is the most important heading for accessibility and search engines.
- Add a paragraph:
<p>You may call me [preferred name]</p>.
- Refresh the browser to see changes.
- Work inside the
-
7. Making Text Bold
- Use
<strong>…</strong>around text to make it bold. - Example:
<p>You may call me <strong>[preferred name]</strong></p>. - Remember the cycle: Edit → Save → Refresh , Edit → Save → Refresh , Edit → Save → Refresh...
- Use
Take a Moment to Celebrate
Congratulations—you have just coded your first website! 🎉
This is an amazing accomplishment. Notice how it feels right now and hold on to it. When coding gets tough, remember that progress happens in bite-sized steps that stack up. It can feel like nothing is working… and then suddenly you hit an “aha!” moment. Keep showing up, keep taking small steps, and those moments will come. That’s the reward on the other side: a growing sense of calm, confidence, and excitement. Tough it out—you’ve got this.
P.S. If you don’t “got this” yet, keep going until you do.
Effort and Expectations
I’d like to take a minute to talk about effort and expectations. What you get out of this class will depend a lot on what you put into it outside of class. When I first learned to code, I took a three-credit course with no prerequisites. The expectation was about 15 hours per week of work outside of class, because technical courses usually combine lecture hours with lab hours, and most of the learning is hands-on.
We are not doing anything that heavy here, but I do think it’s realistic to spend an hour or two each week practicing on your own. If you do, you’ll get so much more out of this experience. Please don’t get discouraged if things feel hard or confusing. I’m here to help you if you want to understand it better, but it’s also okay if coding isn’t something you want to dive deeply into. My hope is simply that you come away with a better eye for how websites are structured, even if you decide this isn’t your thing long term.
I encourage you to start paying attention to websites you visit—how the text, images, and layouts are presented—now that you have an idea of what’s going on behind the scenes. If, after another class or two, you find that hand-coding isn’t working for you, let me know. If most of the group feels that way, we can shift gears and use templates where you fill in the content without having to code everything from scratch. At the same time, if there are one or two of you who are really enjoying this and want to go deeper, I’ll happily provide more advanced assignments and resources. My goal is to meet you where you are and make this class worthwhile for everyone, whether you just want a light introduction or a stronger foundation in web design.
Next Week’s Class
Next week we will most likely meet in the Fellowship Hall. However, if you don’t hear that in the form of an official announcement, plan to go to our regular classroom.
When you arrive, please go ahead and open your computer, pull up your website, and have VS Code and your index.html file open side by side like I showed you. I’ll spend the first 15 minutes of class walking around to check your setups.
After that, we’ll use the rest of the time to answer questions and address anything you’re struggling with or curious about.
In the Coming Weeks
- Introduction to the About Me template (end goal).
- Understanding containers inside containers (sections, headers, paragraphs).
- Difference between
<head>and<header>. - Preview of CSS styling (colors, fonts, layout will come later).
Class Recap – Week 4
-
Objectives
- Work through the YouTube tutorial Lecture - Week 4 below.
- Practice the Edit → Save → Refresh cycle repeatedly after every step.
- Write down questions/topics you want to discuss next class.
-
Details
The content for Lecture - Week 4 will be very challenging for some of you. Each of you know your own acceptable level of frustration and I challenge you to push that limit while staying within a healthy boundary. If you get stuck, don’t worry—feel free to reach out with any questions if you want to continue. If you don't, then I ask that you form a comment using the <!-- HTML comments code --> addressing the issue you were having and why you thought it was a good stopping point for you. I consider this the same as "assignment complete" even if you didn't make it to the end of the video. All other challenges will be addressed together in class on Thursday.
Remember: If you have a question, chances are someone else has the same one. Don’t be afraid to ask. However, if you’re not ready yet, write the question out as if you're going to ask it. Putting it into words is step one toward solving it—it sharpens your thinking, exposes what’s missing, and gives you ready-made search terms. Many times you’ll spot the answer while you’re writing.
Alternate Assignments: If we talked about alternate assignments, please be sure to discuss that with your parents, and we can review your options after class on Thursday. I have already prepared two projects, and I believe you will still feel very accomplished at the end of our class, no matter which route you take.
-
Lecture - Week 4
-
Instructions
- You will be following along and coding your own About Me page using the answers from your student questionnaire. If your questionnaire is not finished, placeholder text is acceptable for now
- This video is a little over an hour long. Don’t panic—I expect each of you to approach it differently, based on your current level and what feels manageable. You’ll know that your assignment is "complete" based on the criteria outlined in the first paragraph under Details located above the video.
- Because I am long winded and easily distracted, I recommend watching it muted at 2x speed and only slowing it down when you need to.
- You may want to watch the first 5 minutes with the sound on. After that though, I recommend muting it and only turning the sound back on if you need further explanation about what’s happening on your screen.
- Implement the Edit → Save → Refresh cycle repeatedly after every step.
- As needed, remember to navigate between changes you’ve made using CMD + Z and CMD + Shift + Z on a Mac, or CTRL + Z and CTRL + Shift + Z on a PC.
- Keep notes as you go in the form of <!-- HTML comments --> within your code.
This week's assignment may take one week or multiple weeks. However, by the time you complete it, you will have the entire HTML portion of your website built. With that being said, I want to point out: it’s going to be rough around the edges—and that’s okay!
Congratulations—you have just coded your second website! 🎉
You are now at the point where you should be thinking about the picture and color scheme you would like to use for your About Me page.
-
Next Week's Class
When you arrive, please go ahead and open your computer, pull up your website, and have VS Code and your
index.htmlfile open side by side, just like in the assignment.Goals:
- Address any questions you have.
- Identify the mistake I made in my code. Were you able to spot it?
- Briefly discuss HTML semantic elements (like
<header>,<main>,<footer>, and<section>) and how<main>can also be divided with non-semantic<div>elements. - Explore options for the spring semester.
-
In the Coming Weeks
- Refine our existing HTML.
- Linking CSS documents to HTML.
- Apply CSS for formatting and design.
- Add links and pictures.
- Explore sourcing code snippets (including “vibe coding”) to apply to your page, time permitting.
- Learn proper file structure to prepare your website for deployment.
Class Recap – Week 5
-
Disclaimer
First of all, I’m so sorry about the delay in getting this week’s assignment posted. I’m a real person, and sometimes technical issues happen—computers break, technology is finicky, and this week I experienced a little bit of all of that. Thank you for your understanding!
Because of the delay, my expectations are pretty low this week. I just hope everyone has been able to get through the video from last week. Below you’ll find a reminder of what we covered in class on Thursday and what’s coming up. If you’re able to work on any of the new items, that’s great—but if not, that’s absolutely okay.
-
Objectives
- Finish working through the video Web Design - Lecture 4. I've linked it below, but if you finished last week, you do not need to re-watch it.
- As you code, continue to practice the Edit → Save → Refresh cycle repeatedly after every step.
- Choose your design elements - More details below.
-
Repost: Lecture - Week 4
-
Choose Your Design Elements
- Pick the image you would like to use for your site. Be sure to pay attention to the size and quality as well as things like colors and orientation. I recommend also selecting a back-up option just in case.
- Choose your color scheme using a tool like Canva's Color Palette Generator.
- Use the WebAIM Accessibility Checker to refine your color scheme and make note of the hex values. This ensures that your design is readable for everyone. Feel free to use the photo upload option if you need some inspiration or a starting point for picking colors.
-
Next Week's Class
When you arrive, please go ahead and open your computer, pull up your website, and have VS Code and your
index.htmlfile open side by side, just like in the assignment.The Plan:
- Our next class will be a studio work day.
- You'll spend the majority of our time together coding in class.
- I will come around and meet with each of you to talk through any issues or pain points you're experiencing.
- My goal is for everyone to be at a point where you're ready to move forward, if possible.
-
In the Coming Weeks
- Refine our existing HTML.
- Linking CSS documents to HTML.
- Apply CSS for formatting and design.
- Add links and pictures.
- Explore sourcing code snippets (including “vibe coding”) to apply to your page, time permitting.
- Learn proper file structure to prepare your website for deployment.
Class Recap – Week 6
-
Good News
By the time you finish this video, you’ll be 95% of the way done with your webpage. Our last class is November 13, and Presentation Night is November 14. We only meet five more times. From here, we’ll critique and refine your design using peer feedback and our evaluation framework that we will be discussing soon. Keep up the good work!
Don’t take shortcuts now; they create headaches later. At 95% complete, the real value comes from the refinement process, the part that makes designs stand out. You have the foundation; now you can explore and polish—the fun part. Don’t cheat yourself out of it.
-
Objectives
Now that you’re finished with Web Design – Lecture 4, it’s time to style your HTML using a Cascading Stylesheet. You will create your own using the video below where we discuss:
- File Structure and Creating a Root Folder
- Inserting Images
- Linking Your CSS
- Adding Notes Within CSS
- Three Types of CSS
- External Style Sheets and Vibe Coding
- Using Vibe Coding to Manipulate Existing Code
- Using Vibe Coding to Add Styling Effects
- Adding Links to a Webpage Using the Anchor Tag
-
Lecture - Week 5
-
Next Week's Class
When you arrive, please go ahead and open your computer, pull up your website, and have VS Code and both your
index.htmlandstyle.cssfiles open side by side, just like in previous weeks.The Plan:
- Our next class will be a studio work day.
- You'll spend the majority of our time together coding in class.
- I will come around and meet with each of you to talk through any issues or pain points you're experiencing.
I can't wait to see your designs!
-
In the Coming Weeks
- We will establish the final project's grading criteria.
- Partner up to gain experience both giving and receiving constructive feedback from peers.
- Refine our designs based on the feedback we receive.
Class Recap – Week 7
-
Hey Everyone,
I hope you’ve all had a good week so far! Your CSS is coming along nicely — both for those of you who are still working on it and those who are refining your designs after receiving feedback.
I'd like to commend those of you who have given this project your best effort so far, even if it hasn’t resulted in a website just yet. I am so proud of you all! I’ve been bragging all week about what great students I have!
For everyone else,
it’s never too late to procrastinate.No, wait—that’s bad advice I read on a sticker once. But in all seriousness, it is almost too late to procrastinate.You still have time to leave this class with a completed website; however, we’re reaching the point where it will be very difficult to catch up if you come to class this week without a strong attempt at creating and linking CSS to your HTML.
I want to give anyone who wants to catch up the chance to do so before we move further into adding advanced CSS features, so no one who’s trying to stay on track feels left behind. For that reason, I've decided to hold off on adding additional instructional content this week. That means I would like for us to focus on user experience and ways to improve our own websites based on the internet around us.
-
Objectives
- Apply or refine CSS if not already finished.
- Observe design features as you interact with websites this week.
- Identify one inspiring and one frustrating website.
- Give feedback on presentation-night format and permissions.
-
Creating, Linking and Refining CSS + Inserting Links & Images (Objective 1)
You can skip to the next section if I've seen your CSS and provided you with feedback.
If you have not already finished, you should be creating your CSS and/or refining your design using the Web Design – Lecture 5 video, where we discuss the following:
- File Structure and Creating a Root Folder
- Inserting Images
- Linking Your CSS
- Adding Notes Within CSS
- Three Types of CSS
- External Style Sheets and Vibe Coding
- Using Vibe Coding to Manipulate Existing Code
- Using Vibe Coding to Add Styling Effects
- Adding Links to a Webpage Using the Anchor Tag
Special Note For Those Who Prefer Written Instructions:
For those of you who prefer written instructions, I recommend opening the video in YouTube, clicking more in the description below the video, and finding the button that says, "Show Transcript" in blue. This will open a dialog box with the video captions. Click the 3 dots in the top right, there you will find the option to toggle the timestamps off. Then you can highlight and copy the transcript and place it into chatgpt with the following prompt:
"Please provide comprehensive instructions for a [device type] running [operating system] using the following transcript from a video tutorial."
- This is supplemental. Only do this if the video's don't work well for your learning style.
- Be sure to fill in your own device type and operating system in the prompt.
- I recommend placing the prompt prior to the transcript or it may miss your request.
-
Website Observations and UX (Objective 2 & 3)
For those who have already created and linked their CSS and received feedback, this week’s focus is on observing and evaluating user experience (UX) and design features across different websites.
Note: If you are still working on your CSS, this assignment is not for you. You should be focusing all of your energy on that for now.
Part 1 – Website Features: Explore a few websites and identify specific features or design techniques that improve the overall user experience. This might include visual or interactive elements such as hover effects, navigation menus, favicons, countdowns, animations, or other CSS-based details you find engaging or useful. Be prepared to describe one or two of these features and how they could enhance your own site.
Part 2 – Website Comparisons: Provide two examples—one of a website that frustrates you and one of a website that you enjoy using. Clearly describe what makes the “bad” site difficult to use (for example, buttons that don’t behave as expected, poor layout, or confusing navigation). Then, explain why the “good” site works well—perhaps the process flows naturally, the design feels intuitive, or features like saved preferences make it easy to complete a task.
Your notes don’t need to be lengthy—just enough to demonstrate your observations and reasoning. We’ll discuss these examples together in class and talk about which design techniques might be worth incorporating into your own CSS.
-
Looking Ahead to Presentation Night (Objective 4)
Leadership has mentioned signing up for Presentation Night, and since we can’t physically show our websites, we’ll need to get creative about how to share our work. One idea is a slideshow, but let’s be honest—slideshows can be kind of boring.
I’m so proud of what you’ve all built this semester, and I want to brag on you a little! But before we lock anything in, I’d love your input. How can we make this fun and unique? What are some creative or out-of-the-box ways we could show off what we’ve done together?
Many of you have been part of this program longer than I have, and I’d really value your ideas and perspective. What are some memorable things that have been done to showcase student's work during your time here at HHE. Think big—I’m all ears!
I love for each of you to share 1 suggestion or one memorable thing you've seen in the past at Presentation Night
-
Next Week's Class
When you arrive, please go ahead and open your computer, pull up your website, and have VS Code and both your
index.htmlandstyle.cssfiles open side by side, just like in previous weeks.For those who have already gotten feedback and don't have any questions, please get your website examples ready to share.
The Plan:
- I will come around and meet with each of you to talk through any issues or pain points you're experiencing and provide feedback.
- We will view student's website examples, good and bad, and discuss ways to accomplish any features you were attracted to on websites from which you gained design inspiration.
- Finally, we will talk about your preferences for Presentation Night.
I can't wait to see your designs!
-
In the Coming Weeks
- We’ll establish the final project’s grading criteria.
- Partner up to gain experience both giving and receiving constructive feedback from peers.
- Refine our designs based on the feedback we receive, including…
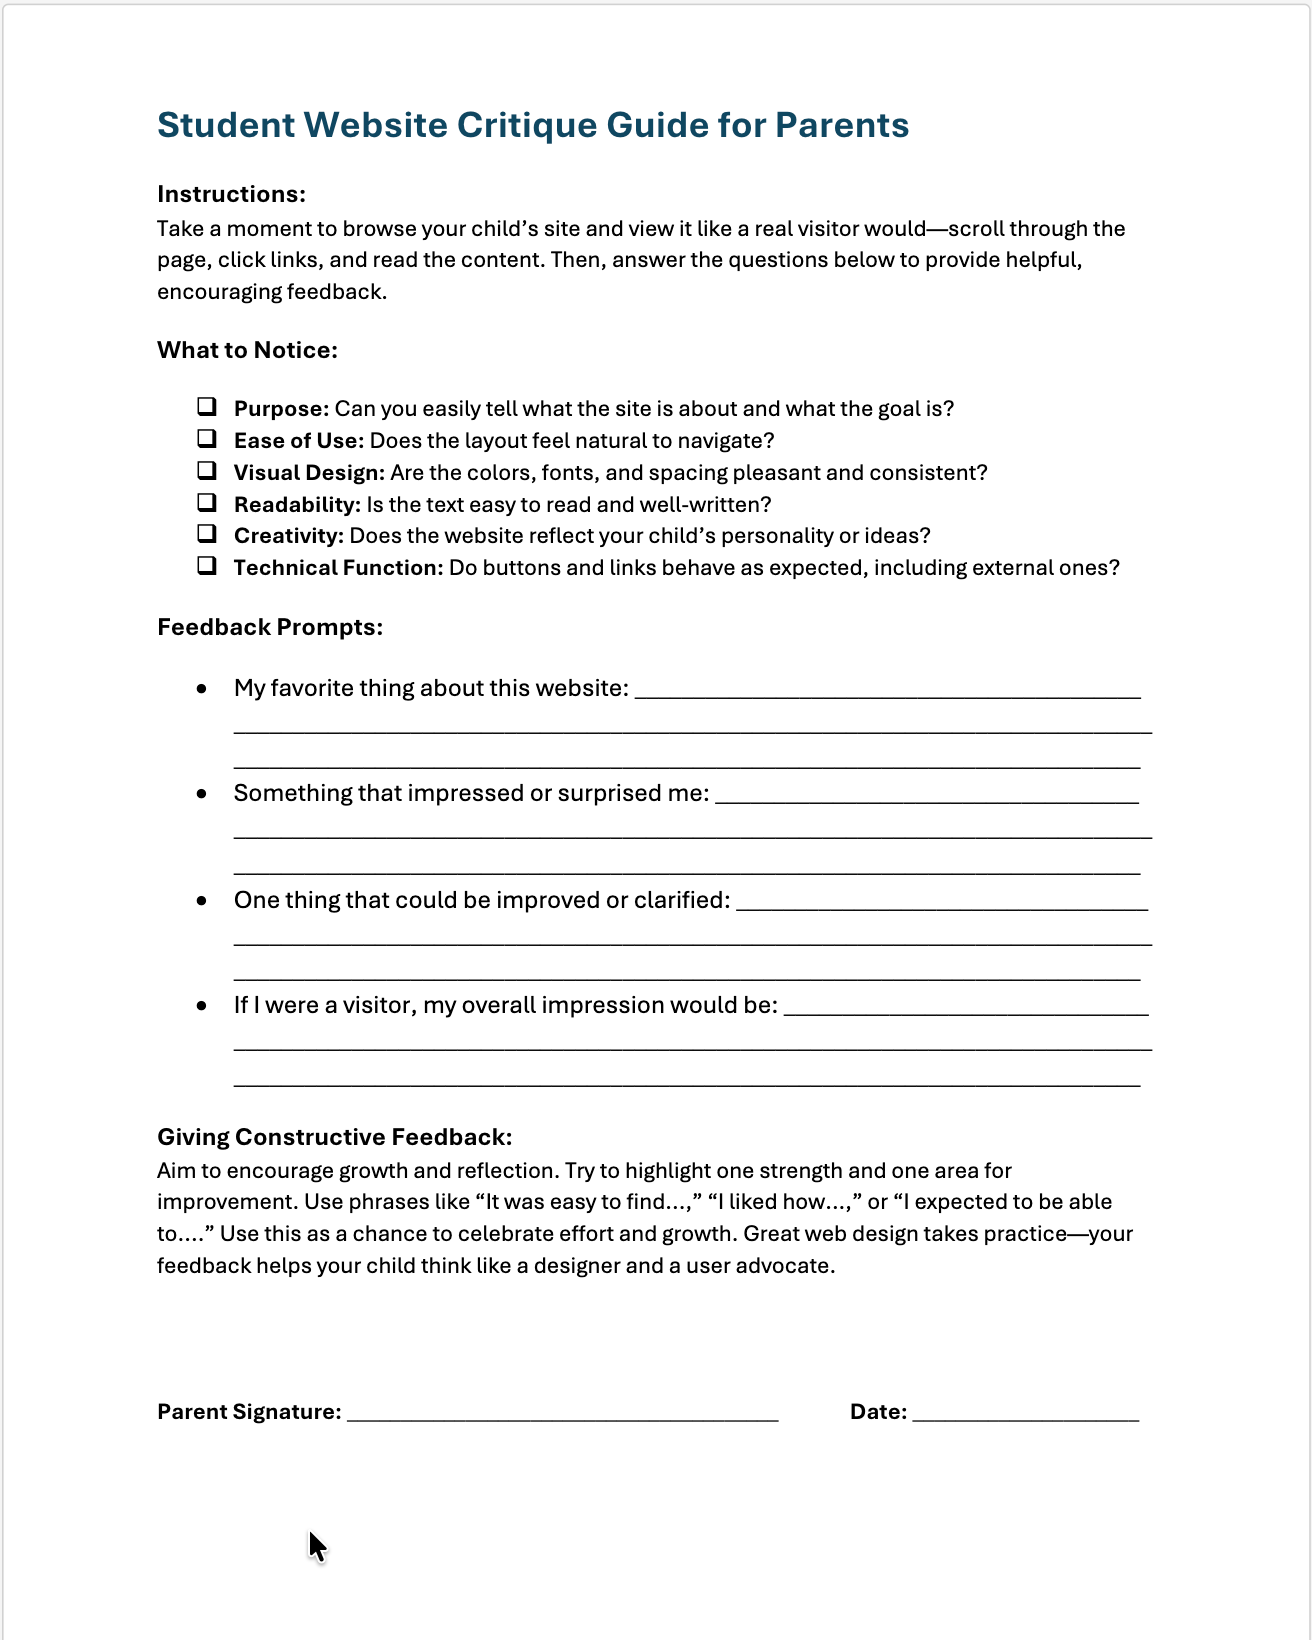
- Feedback From a Parent! That’s right—parents have a homework assignment coming soon! I’ll be providing them with a simple guide to use when reviewing your websites. This will help them see firsthand the creativity and effort you’ve put into your projects (and give them a glimpse into what we’ve been working on in class). This is your moment to shine—make them proud!
In UX Design, we call this a Usability Test. A Usability Test is when real users interact with a website or app to uncover what works well and what might cause confusion or frustration. Some of you will complete a variation of this in this week’s Objective 3—the only difference is that, since your sites aren't live, we call it a Pre-Launch Evaluation.
Just like in the professional world, you’ll use feedback from real users to guide your refinements and improve the overall user experience of your site.
-
TL;DR – Week 7 Highlights
- Catch up on CSS: If yours isn’t finished or linked, make that your top priority this week.
- UX Exploration: Those who’ve completed CSS should observe other sites—find one feature you love and one that frustrates you.
- Website Examples: Bring your good and bad website picks to class for discussion.
- Presentation Night: Share ideas on how we can creatively show off our work (something better than a slideshow!).
- Next Week: Have VS Code open with your HTML and CSS side by side and be ready to share progress.
- Coming Soon: Parent “Usability Test” feedback—your chance to shine and show off what you’ve built.
Class Recap – Week 8
-
Greetings!
I want to apologize for unexpectedly having to miss our last class due to my son being sick. He is doing much better this week, and thankfully, no one else caught what he had. I do plan on being there this week. If I had known sooner, I would have tried to plan accordingly, but it was a very last-minute situation. However, I hope that means you all enjoyed your game of Bingo — did you learn anything?
-
Our Agenda
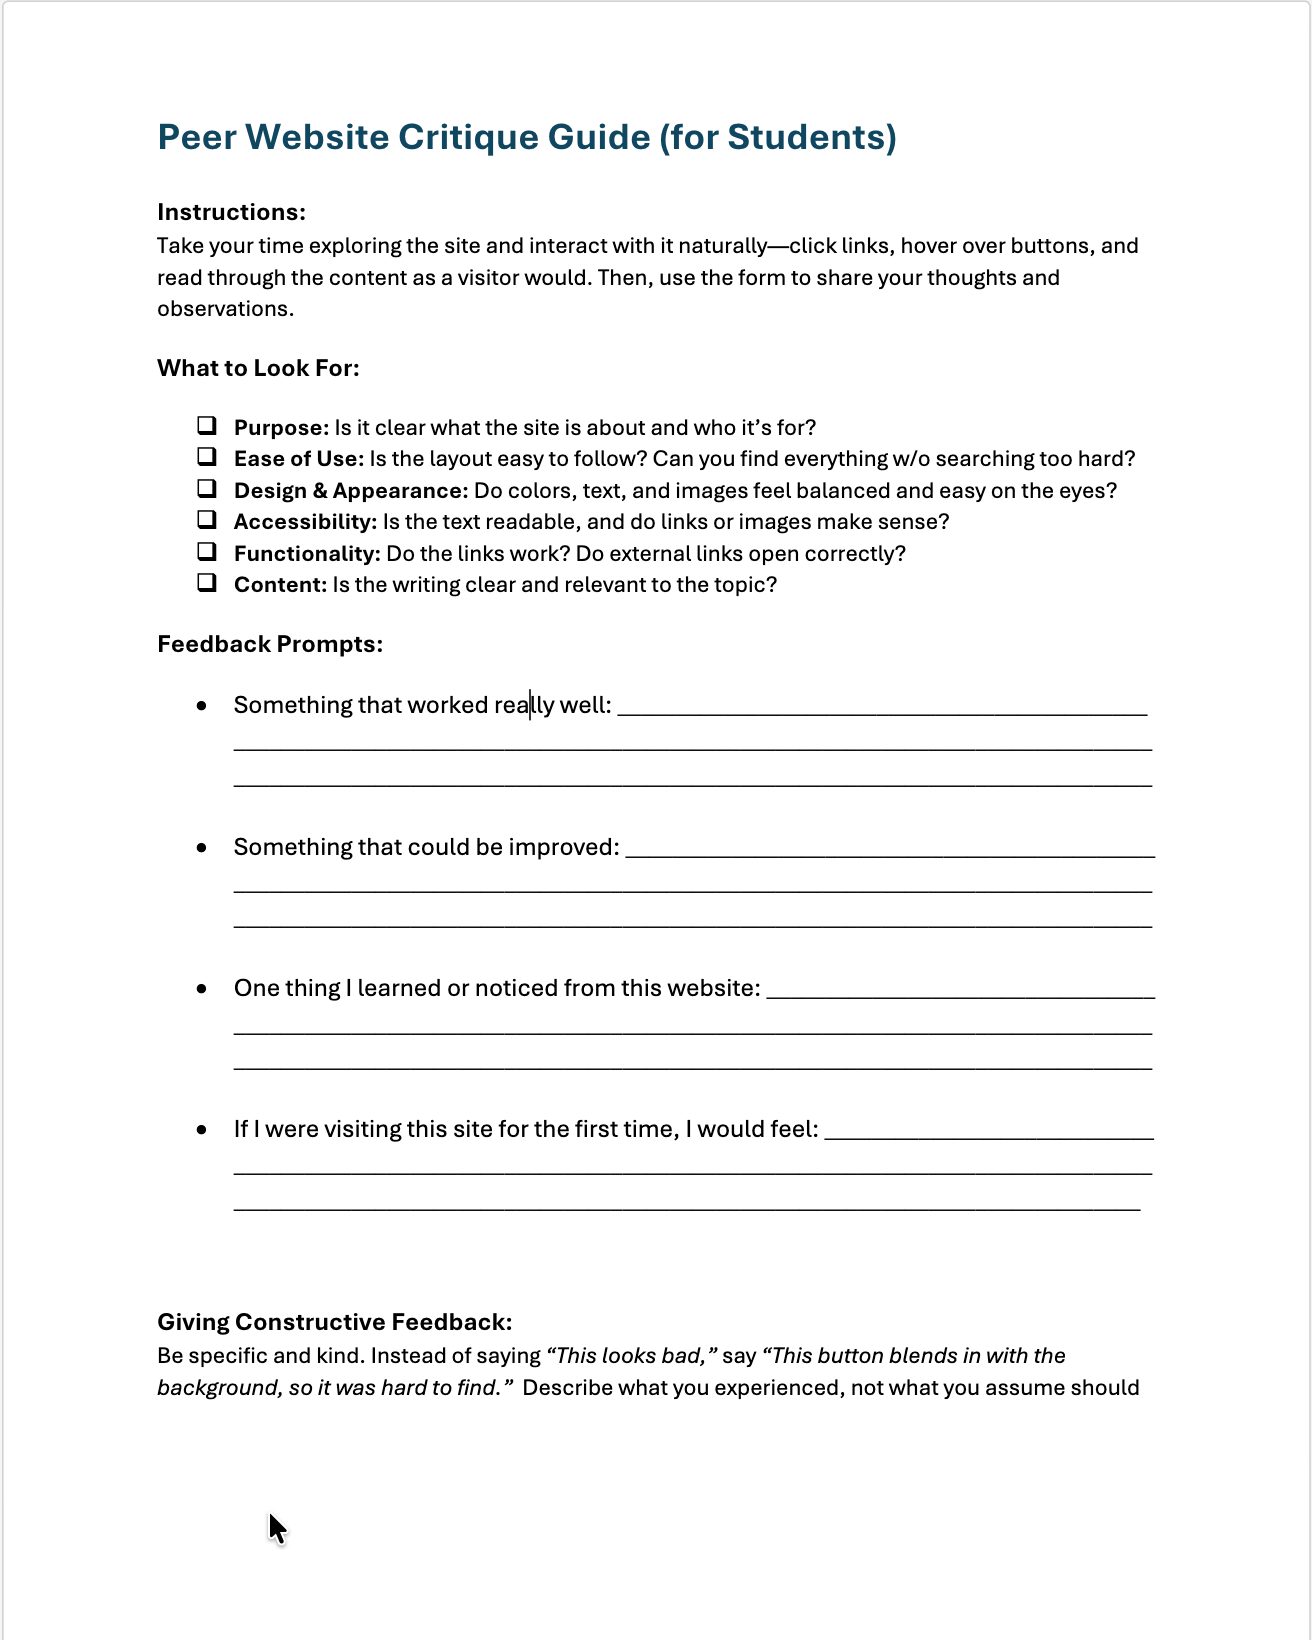
On Thursday, I will provide you with the two handouts you see below. The Peer Website Critique Guide and the Parent Website Critique Guide. We will work on the Peer Website Critique Guide in class after you’ve partnered with someone, and the Parent Website Critique Guides are due back next week.
I know many of you are ready to add CSS features beyond the basics we've covered. If that's you, check back regularly — I will be adding short how-to videos as they are completed. For now, I’ll include a list of requests you can make from VS Code Copilot or ChatGPT, depending on your preferences, to get you started.
-
Peer Critique Guide
-
Parents Critique Guide
-
Prompt's To Try
- Text Hover Effect: "Write CSS so my main heading changes color smoothly when hovered."
- Profile Picture Styling: "Add CSS that gives my profile picture rounded corners and a soft shadow."
- Image Filter on Hover: "Make my profile photo start in grayscale and fade to full color when hovered."
- Section Background Transition: "Add a hover effect that changes the background color of my ‘About Me’ section with a transition."
- Fade-In Text Animation: "Write a CSS animation that fades in my introduction paragraph when the page loads."
- Text Glow Animation: "Add a soft glowing text effect to my name heading using a CSS text-shadow animation."
- Floating Image Animation: "Create a looped animation that makes my profile image gently float up and down."
- Pseudo-Element Underline Effect: "Use ::after to create a colored underline that slides in under my name when hovered."
- Responsive Layout (Media Query): "Write a media query so my layout switches from two columns to one column when the screen width is under 700 px."
- Animated Gradient Background: "Create a gradient background that slowly shifts colors using a keyframes animation."
Hints:
Always follow your request with, "How do I add this to my current code?" and then paste your code afterwards.
I encourage you to try a few of these on your own or attempt one of the options in the videos below. The higher the number in the list, the more difficult the addition. At least 2 styling techniques should be applied to your final project, but you are welcome to add more than that.
-
CSS Hover Animation Prompt
-
When Your Copilot Suggests Redundant CSS
-
Grid Layout Prompt + Refinements
-
Adding a Glow Effect to a Heading
-
Adding a Background Image with CSS (and Understanding File Paths)
-
Next Week's Class (same as last week since we didn't get to this due to my absence)
When you arrive, please go ahead and open your computer, pull up your website, and have VS Code and both your
index.htmlandstyle.cssfiles open side by side, just like in previous weeks.For those who have already gotten feedback and don't have any questions, please get your website examples ready to share.
The Plan:
- I will come around and meet with each of you to talk through any issues or pain points you're experiencing and provide feedback.
- We will view student's website examples, good and bad, and discuss ways to accomplish any features you were attracted to on websites from which you gained design inspiration.
- I will provide you with the Peer Website Critique Guide and the Parent Website Critique Guide. We will work on the Peer Website Critique Guide in class.
- Finally, we will talk about your preferences for Presentation Night.
I can't wait to see your designs!
Final Projects – Week 9
-
Project Overview
The images below are from the packet sent home last Thursday. Please don't hesitate to set up a time to troubleshoot any issues or submit work for feedback via email.
If you’d like feedback before the due date, you can easily share your project by zipping your folder. Simply right-click your project folder, select Compress or Zip, then drag and drop the zipped file into your email to send it to me. This allows me to view your full project, including folder structure and any code issues. A few students have utilized this method—it’s quick, simple, and works great!
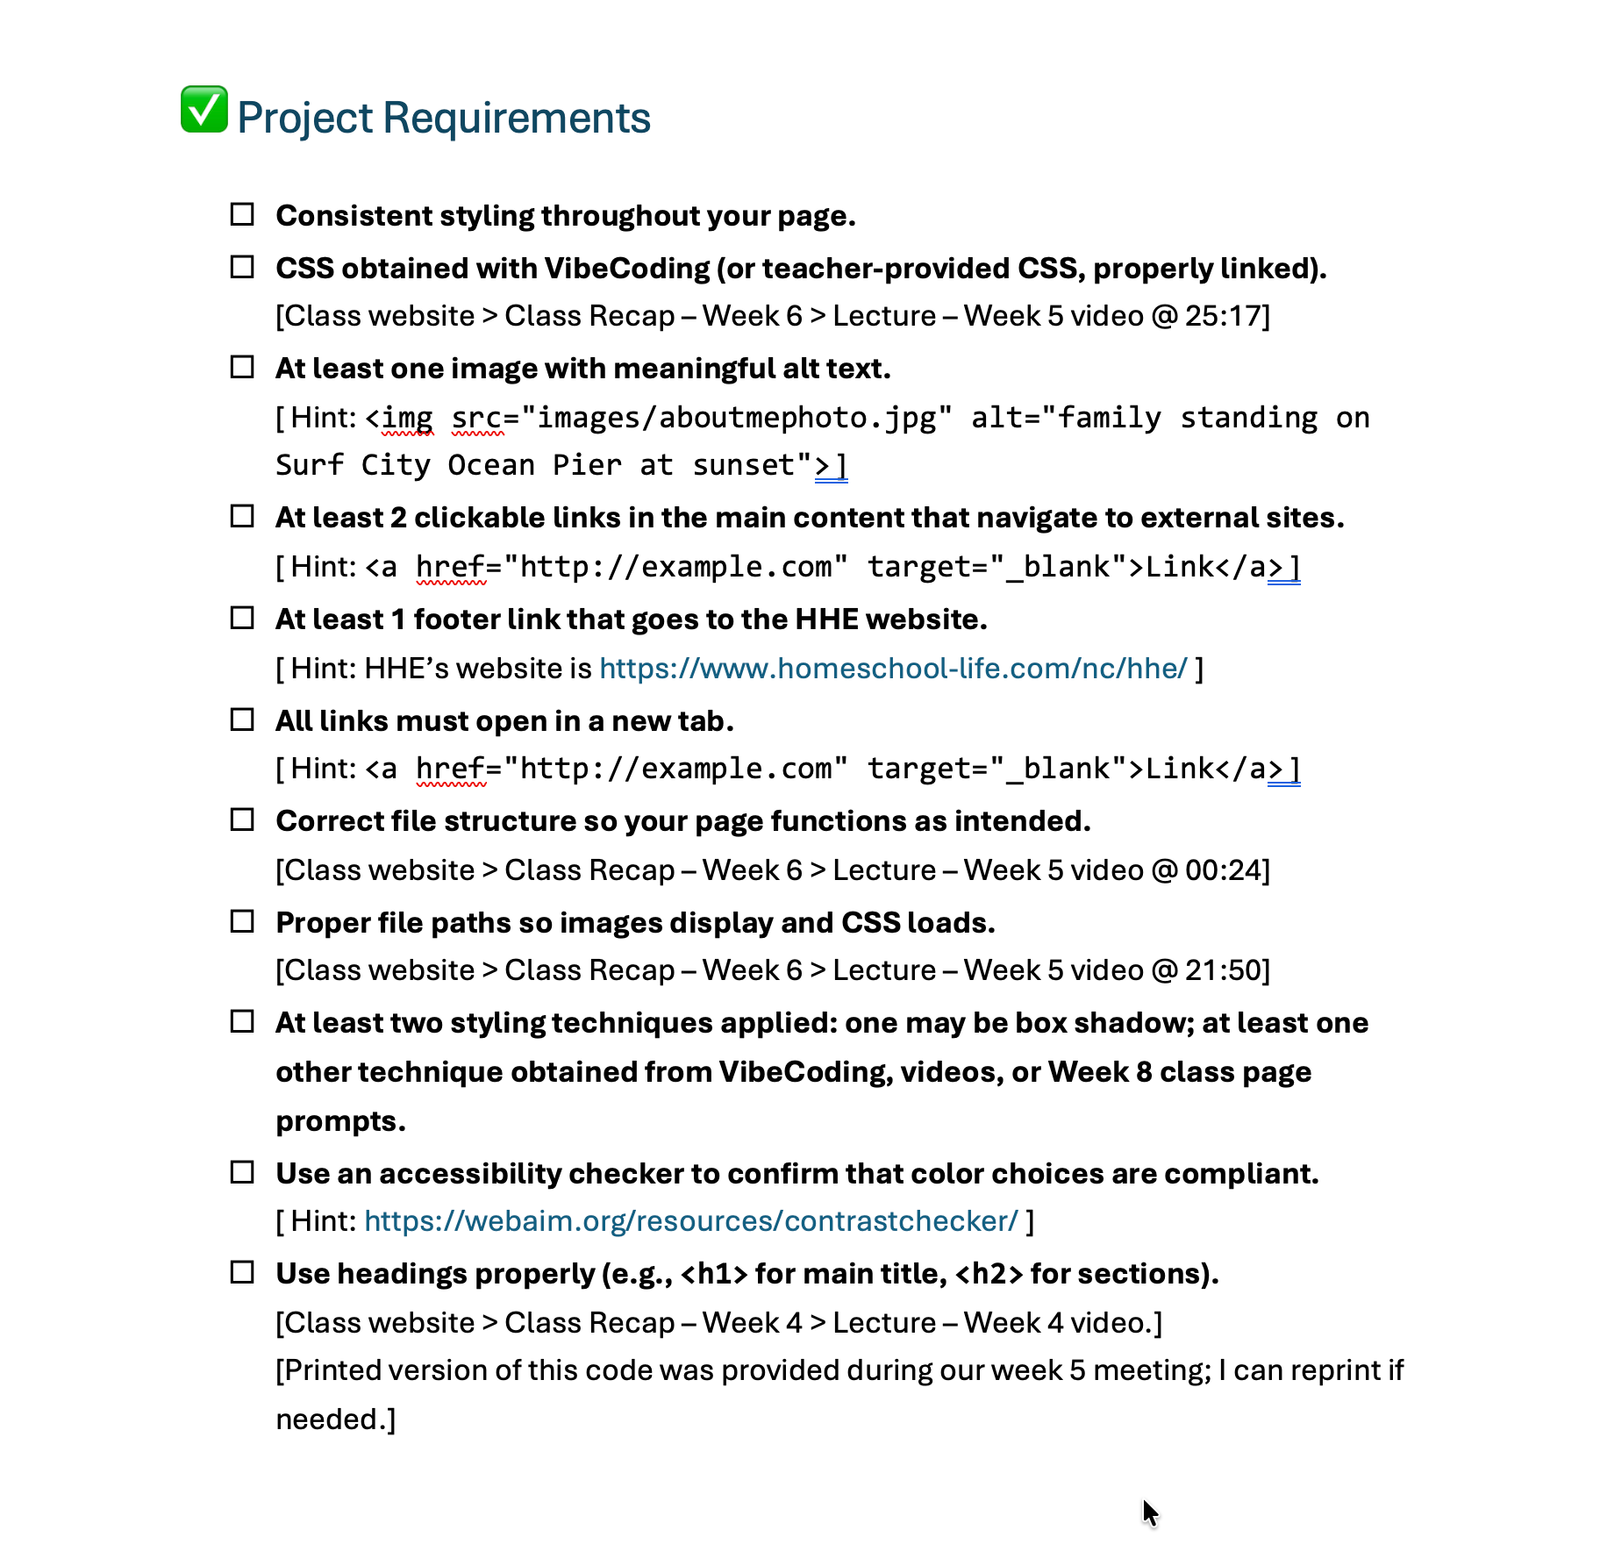
Lastly, if you decided to go a completely different route with your website and don’t want to use the About Me content, and you just want to utilize VibeCoding, I’m absolutely okay with that and would love to see what you create. Again, try to follow the guidelines under Project Requirements—remember to properly link your CSS and images, use alt text for any images, and include some clickable links that open in new windows. The footer should also link to HHE’s website. I can’t say this enough—your success in Web Design depends on how you use the tools and resources around you to create something that is truly your own. Memorizing code simply speeds up that process a little.
Project Due Date: November 6th
Presentation Night: November 14th

-
Project Requirements Check List
-
Ready to Submit Your Project?
Once you’ve finished your project, the two videos below will guide you through the next steps. Please read each video’s YouTube description to see which one applies to your setup, as this depends on how your files are organized. Reach out if you have any questions!
-
Final Project Submission: Quick Overview for Ready-to-Submit Projects
-
Final Project Submission: Full Walkthrough & Troubleshooting Guide
-
Links Discussed During Class Last Week (not related to project requirements)
Everything else beyond this point is just information we discussed last week or additional content for self-learning outside of class. I'll try to update later for better presentation, but for now my main goal is to get videos added to help you package your projects to hand over.
-
HTML in 5 Minutes
-
CSS in 5 Minutes
-
Tools
HTML & CSS Generator Tool by webcode.tools -
My Design Inspiration Site
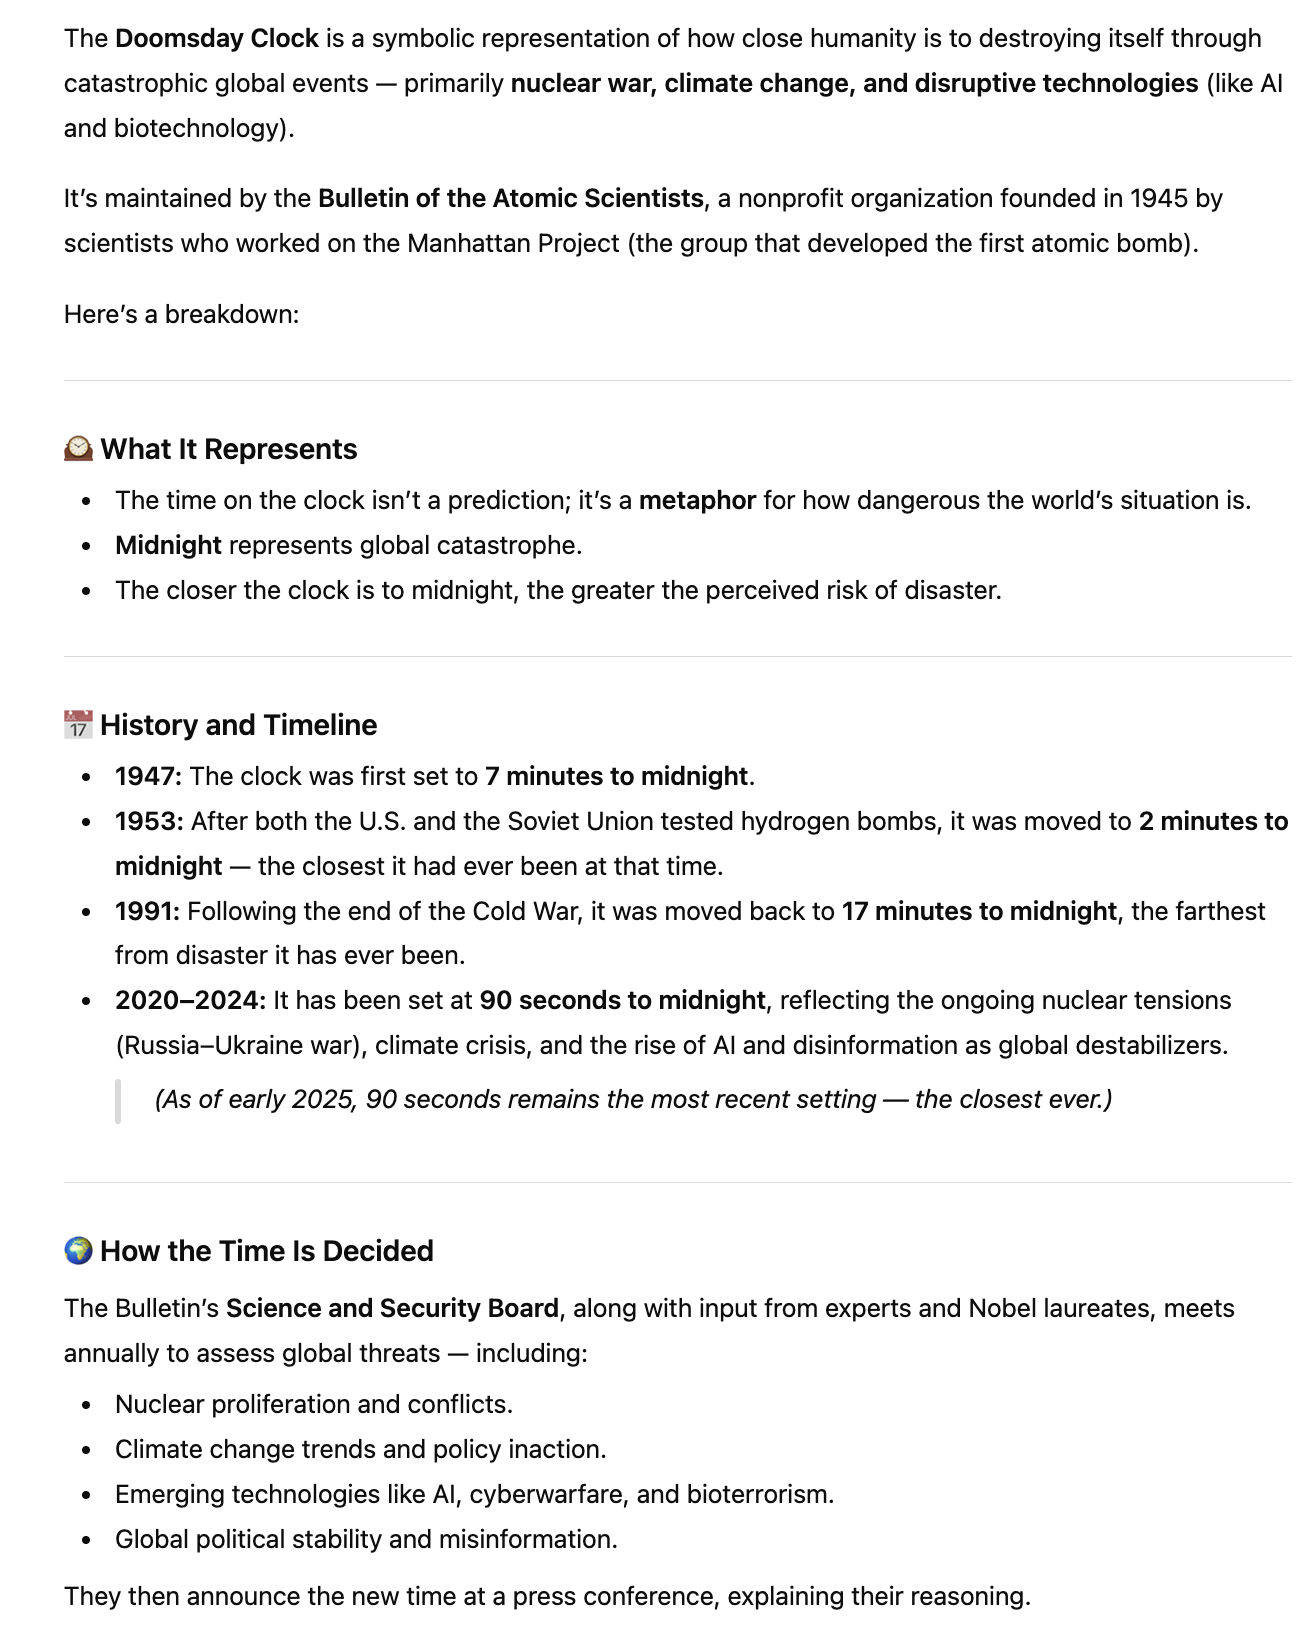
Bulletin of the Atomic Scientists—A Timeline
-
My CTI-110 assignment Week 1
If you'd like to know what to expect for a weekly assignment when taking an online introductory class to Information Technology, this is a good example. This week was introduction to HTML and this is the assignment we had to complete.
Responsive Web Design HTML Cat Form Assignment -
My CTI-110 assignment Week 2
If you'd like to know what to expect for a weekly assignment when taking an online introductory class to Information Technology, this is a good example. This was the assignment following the HTML assignment above, serving as an introduction.
Responsive Web Design CSS Cafe Menu assignment -
FreeCodeCamp.com Certification Opportunity
If you complete all 4 activities (Learn HTML by Building a Cat Photo App, Learn Basic CSS by Building a Cafe Menu, Learn CSS Colors by Building a Set of Colored Markers, and Learn HTML Forms by Building a Registration Form) you can earn a Certification through FreeCodeCamp.com. On this page, you will find 5 different Certification Opportunities that cover Web Design concepts from Beginner-Friendly (like the two listed above) to complex.
Responsive Web Design Full Course List for Certification
Our Final Class – Week 10 New Content!
-
Our Final Class
Hey everyone! This all went out in a text message, but just a quick reminder that Wednesday is the last day to turn in projects so I can finish prep for presentation night. However, if you’d like to turn yours in Thursday, that’s fine too—just let me know by Wednesday. Thursday will be pretty laid back; I have a few things to share (including Patriot Pretzels!). Please let me know if you have any allergies so I can plan accordingly. I’m getting salted sticks and cinnamon sticks.
-
Learning Python
-
David Carroll from "The Great Hack"
-
More on Data Analytics
A great documentary to watch that is free on PBS is NOVA Secrets in Your Data
-
Even More on Data Analytics
-
In this very long but brilliant exposé, The Age of Surveillance Capitalism: The Fight for a Human Future at the New Frontier of Power, Shoshana Zuboff asks the tough question... "Will we allow surveillance capitalism to wrap us in its iron cage as it enriches the few and subjugates the many? Or will we demand the rights and laws that place this rogue power under the democratic rule of law?"
-
From purchases to public opinion, Big Data can now predict your next move even better than you can. If you’re interested in doing your own research on this topic, I encourage you to learn about the OCEAN (Big Five) personality model and how Big Data uses it to predict our online habits in order to capitalize on them. How could this be used against us? Find out if you could be susceptible to manipulation using these prompts.
-
Elections and the 'spend $1, write-off $1, earn $1 back theory'. So just how much is being spent?
-
If you are interested in taking a college course on this, I highly recommend WEB-213 at GTCC. The best part is, it has no pre-reqs-so anyone can take it!
-
-
So Who Owns Our Data
Resources on Data Analytics